
Introduction
Imagine turning on your tap and savoring water that feels as refreshing as a mountain spring—clear, crisp, and pure. I remember a time not too long ago when I began noticing subtle changes in our home’s water. The familiar, clean taste seemed to lose its brightness, and a slight sediment in the glass made me wonder: was our water as pure as it once was? That small moment sparked my journey into understanding whole house water filters, leading me to create this Complete Guide to Whole House Water Filter Systems—a deep dive into how they work, key features, and how to choose the right one.
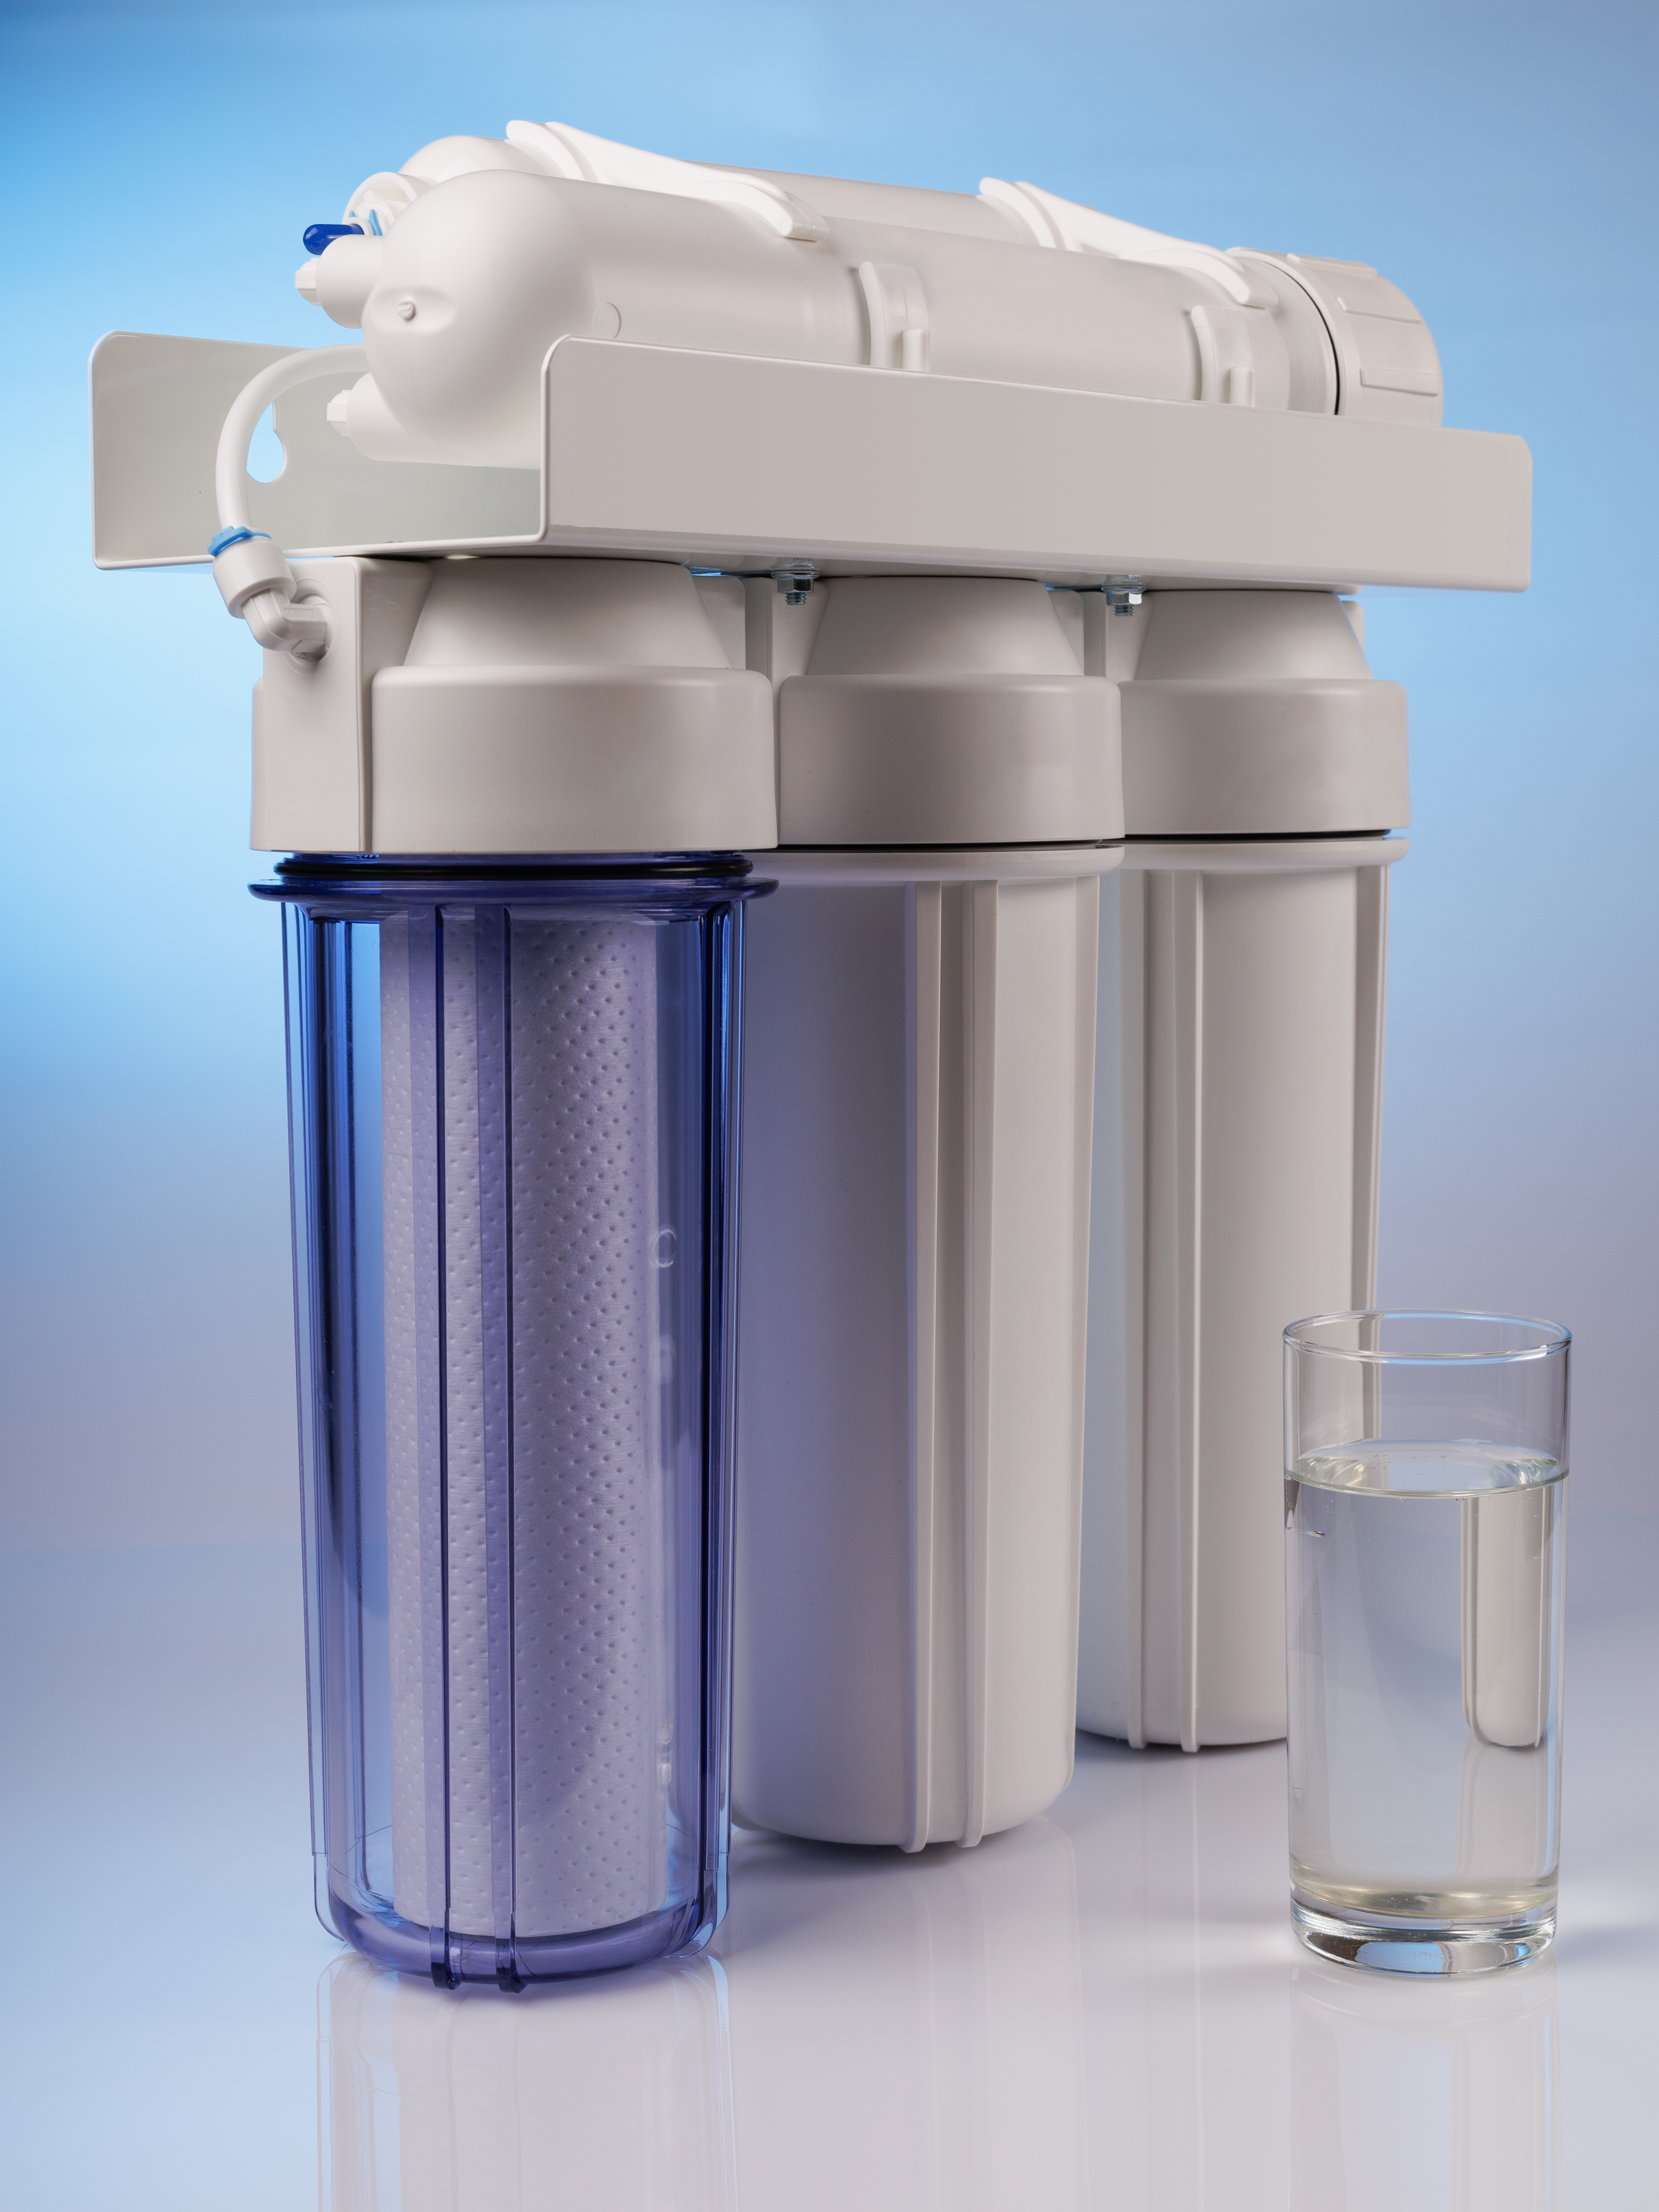
Whole house water filters are the unsung heroes that work silently at the point of entry, protecting our plumbing, appliances, and most importantly, our health. They filter out not just sediment and rust but also harmful chemicals and contaminants that can compromise the quality of water we use for drinking, cooking, and even bathing. In this comprehensive guide, I’ll share what I’ve learned—from choosing the right system to understanding maintenance and replacement schedules—so that you can confidently invest in a solution that ensures every drop remains as pure and refreshing as nature intended.
Find the Best Whole House Water Filter for Your Needs
Not sure which whole house water filter is right for you? Browse our expert-researched recommendations and find the perfect fit for your home.
👉 Explore Whole House Water FiltersWhy Whole House Water Filters Matter
Whole house water filters are the first line of defense. Unlike pitcher filters or under-sink systems, these filters treat every drop of water at the main entry point—before it reaches your kitchen, bathroom, or laundry room. That means:
✔ Every tap in your home delivers clean water
✔ No need for separate filters for drinking, bathing, and washing
✔ Better-tasting water without chlorine or sediment
✔ Protection for your pipes, appliances, and fixtures
But how do you choose the best whole house water filter? With so many options on the market, finding the right system can feel overwhelming.
👉 This guide will break it all down step by step:
✔ How to choose the right filter based on your water quality
✔ Key features to look for (filtration stages, capacity, certifications)
✔ DIY installation tips vs. professional installation
✔ Maintenance & replacement schedules to maximize filter lifespan
✔ Expert troubleshooting tips for common issues
💡 By the end of this guide, you’ll be ready to confidently choose and maintain the perfect water filtration system for your home.
Why You Can Trust This Guide
This guide is built on real research, verified sources, and expert insights. We reference:
✔ NSF & WQA certifications (National Sanitation Foundation & Water Quality Association)
✔ EPA data on water contaminants (EPA Source)
✔ Verified consumer reviews from real homeowners
✔ Expert installation and maintenance tips from industry professionals
👉 We focus on practical, real-world solutions—no fluff, just facts to help you make the best decision.
Quick Summary
- What It Is: A whole house water filter cleans water at the main entry point to your home.
- Who It’s For: Homeowners looking for better-tasting, contaminant-free water from every tap.
- Why It Matters: Protects your health, appliances, and plumbing while reducing chemicals like chlorine and heavy metals.
- What’s Inside: A complete guide to choosing, installing, and maintaining the best whole house water filter.
How to Choose the Right Whole House Water Filter
Now that we’ve covered why whole house water filters matter, let’s dive into how to choose the best system for your home. Selecting the right filter involves more than just picking a well-known brand—it requires understanding your water quality, filtration needs, and household requirements.
When I first began researching whole house water filters, I felt overwhelmed by the endless options and technical jargon. However, it soon became clear that it does not have to be complicated. In this section, you will find simple, practical guidance to help you choose the right system for your home and install it confidently. Whether you are a DIY enthusiast or prefer professional help, this guide breaks the process down step by step.
1. Understanding Your Water Quality
The first step in choosing a whole house water filter is identifying what’s in your water. Different regions have different water contaminants, and not all filters remove the same impurities.
How to Test Your Water Quality
There are two main ways to check what’s in your water:
- Use a Home Water Test Kit
- These kits detect sediment, chlorine, heavy metals, and bacteria.
- Available online or at home improvement stores.
- Look for tests that provide detailed contaminant breakdowns, not just pH levels.
- Check Your Local Water Quality Report
- If you’re on municipal water, look up the Consumer Confidence Report (CCR) on the EPA’s website.
- This report shows contaminant levels and whether they exceed safe drinking limits.
- If you’re on well water, testing is even more important because it isn’t regulated.

Key Contaminants to Look For:
- Chlorine & Chloramines – Found in city water; affects taste and health.
- Sediment & Rust – Common in older pipes and well water.
- Heavy Metals (Lead, Mercury, Arsenic) – Can be present due to old plumbing or industrial runoff.
- Bacteria & Viruses – Found in well water and poorly treated municipal supplies.
2. Key Filtration Technologies Explained
Once you know what’s in your water, the next step is choosing a filtration technology that effectively removes those contaminants.

Sediment Filters (Pre-Filters)
- What It Does: Captures large particles like dirt, rust, and sand.
- Best For: Well water or homes with old pipes that release sediment.
- Typical Lifespan: 3-6 months.
- Tip: If you live in an area with high sediment, look for filters designed to capture particles as small as 5 microns.
Carbon Block & Granular Activated Carbon (GAC) Filters
- What It Does: Removes chlorine, volatile organic compounds (VOCs), and bad taste/odor.
- Best For: Homes on municipal water with high chlorine levels.
- Typical Lifespan: 6-12 months.
- Tip: Choose systems that offer certified performance from trusted organizations such as NSF International and Consumer Reports.
KDF (Kinetic Degradation Fluxion) Filters
- What It Does: Reduces chlorine, heavy metals, and bacteria using copper-zinc oxidation.
- Best For: Areas with high heavy metal content or bacteria concerns.
- Typical Lifespan: 12+ months.
Reverse Osmosis (RO) Systems
- What It Does: Removes up to 99% of contaminants, including fluoride, arsenic, and nitrates.
- Best For: Households needing the most advanced purification.
- Downside: Can waste water and may require additional re-mineralization.
- Typical Lifespan: RO membranes last 2-3 years; pre-filters 6-12 months.
Ultraviolet (UV) Purification
- What It Does: Kills bacteria, viruses, and parasites without chemicals.
- Best For: Well water or any home concerned about microbial contamination.
- Downside: Doesn’t remove chemical contaminants; needs electricity.
- Typical Lifespan: UV lamps last 12 months.
- Tip: If health is a major concern, adding a UV stage can be a smart decision.
Buying & Installation Guides: Choosing & Installing Your Whole House Water Filter
What to Look For When Buying
When I first started looking into whole house water filters, I felt overwhelmed by the endless options and technical jargon. But then I realized—it doesn’t have to be complicated. In this section, I’m here to share simple, practical guidance to help you choose the right system for your home and install it with confidence. Whether you’re a DIY enthusiast or prefer to call in the pros, this guide is designed to break it down step by step.
1. Filter Technology & Components
Not all filters are created equal. The key is to understand the types of filtration stages available:
- Sediment Filters:
Purpose: Remove dirt, rust, and large particles from the water.
Tip: If you live in an area with high sediment, look for filters designed to capture particles as small as 5 microns. - Carbon Block Filters:
Purpose: Eliminate chlorine, volatile organic compounds (VOCs), and improve taste.
Tip: Choose systems that offer certified performance from trusted organizations like NSF. - Advanced Stages (e.g., UV, post-filters):
Purpose: Provide additional purification by neutralizing pathogens and refining water quality further.
Tip: If health is a major concern, a UV stage can be a smart add-on.
2. Capacity & Household Needs
Consider how much water your household uses. Larger families or homes with multiple water-using appliances may require systems with a higher capacity (e.g., 1,000,000 gallons vs. 500,000 gallons). Always check manufacturer guidelines for capacity ratings and how they relate to your water usage.
3. Certifications & Quality Assurance
Opt for products certified by reputable organizations such as NSF, WQA, or IAPMO. These certifications ensure that the system effectively removes contaminants and meets strict performance standards.
High-Level Installation Overview
When installing a whole house water filter, preparation and a clear understanding of your system are essential. Therefore, whether you are a hands-on DIY enthusiast or prefer professional assistance, following these steps will ensure a smooth process.
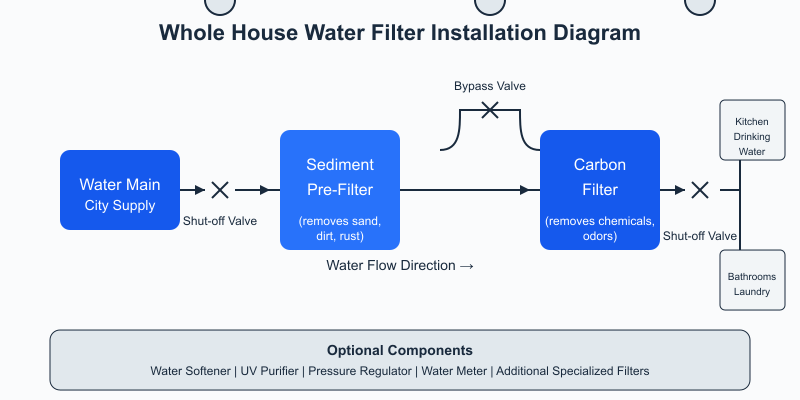
1. Choosing the Right Location
Find a Strategic Spot:
When it comes to installing a whole-house water filtration system, choosing the right location is crucial for both efficiency and maintenance. Ideally, this system should be placed near the main water shut-off valve, which is often found in the basement, garage, or a dedicated utility area. This strategic placement ensures that every drop of water entering your home is treated, providing comprehensive protection against contaminants.
For instance, a homeowner in a suburban area recently installed a whole-house water filter in their basement next to the main shut-off valve. This placement not only simplified the plumbing work but also made routine maintenance, such as replacing filters, much more convenient. Additionally, it is important to consider other factors when selecting an installation spot. These include ensuring the area is safe from freezing temperatures, has access to a power supply (if required), and has adequate drainage for wastewater.
In practice, homes with city water supplies often benefit from placing the system near the water meter for optimal efficiency. This approach helps streamline the process of treating water as soon as it enters the home, ensuring that all water used is filtered and safe. By carefully planning the installation location, homeowners can enjoy cleaner water while minimizing maintenance hassles.
Key Considerations for Installation:
- Accessibility: Ensure easy access for maintenance.
- Environmental Conditions: Protect the system from freezing temperatures.
- Power Supply: Ensure availability if the system requires electricity.
- Drainage: Provide adequate drainage for wastewater.
By following these guidelines, homeowners can effectively integrate a whole-house water filtration system into their plumbing setup, enhancing both water quality and system longevity.
Tip:
Ensure the area is accessible for future maintenance.
2. Preparing for Installation
Gather Your Tools & Supplies:
Before you begin, assemble all necessary tools:
- Filter Housing Wrench: Essential for unscrewing and tightening the housing.
- Bucket & Towels: For catching water and cleaning up spills.
- Plumber’s Silicone Grease: A thin layer ensures a leak-free seal on the gasket.
- Replacement Filters: Confirm you have the right filters that match your system specifications.
- User Manual: Always have the installation guide handy, even if you think you know the process.
Composite Insight: Many professional installers emphasize that double-checking your toolkit before starting can prevent delays. In fact, industry feedback shows that verifying your supplies reduces installation time by up to 30%. Consequently, preparing a dedicated installation kit ensures a smoother, more efficient process.
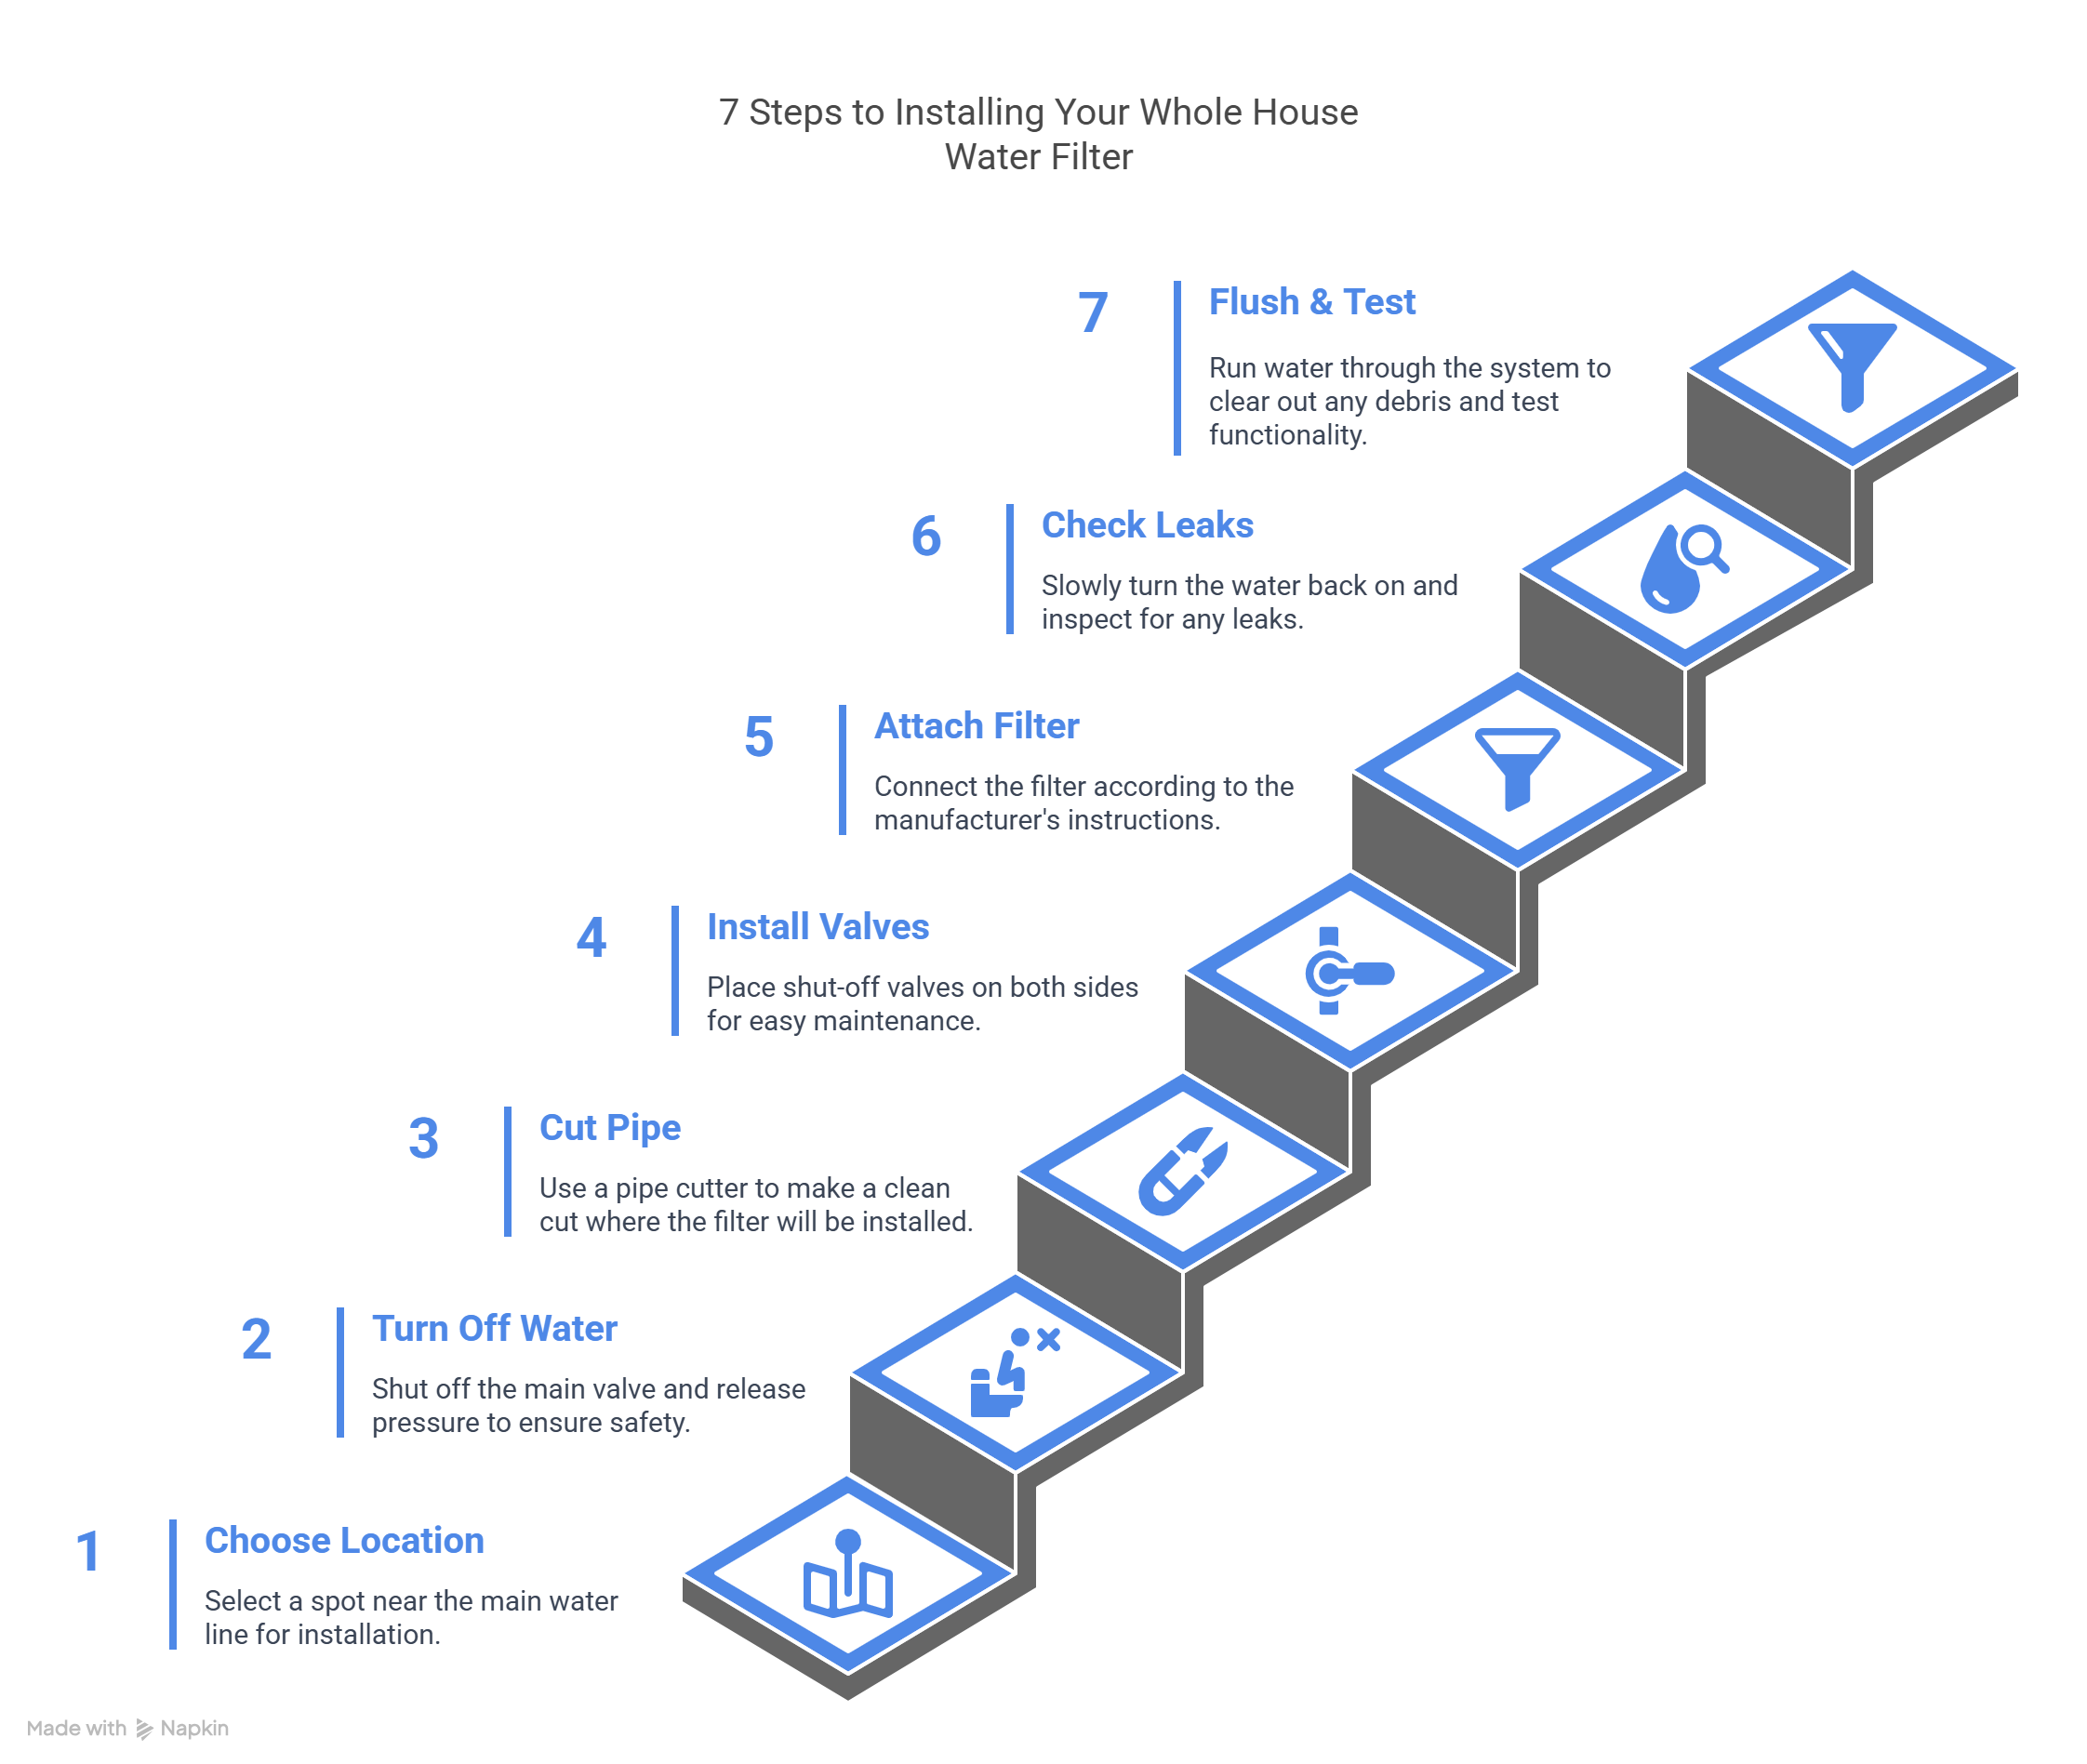
3. The Step-by-Step Installation Process
Step 1: Shut Off Your Water Supply
Begin by turning off the main water supply to prevent water from gushing out during the process. If your system has an outlet valve, close it as well. This simple step is your first line of safety.
Step 2: Release System Pressure
Press the pressure release button on your filter housing. This prevents any residual water from causing a mess when you remove the housing.
Step 3: Remove the Old Filter Housing
Using your filter housing wrench, carefully unscrew the housing. Have your bucket ready to catch any water that might spill. This step can be a bit messy, so working slowly is key.
Step 4: Clean the Housing Thoroughly
Once the housing is off, pour out the remaining water and clean the interior with warm, soapy water. Rinse it well and allow it to dry. Don’t forget to inspect the rubber gasket for any signs of wear—this ensures a good seal when reassembling.
Step 5: Install the New Filter
Place your new filter cartridge inside the housing, ensuring it’s seated properly. Apply a thin layer of plumber’s silicone grease on the gasket to prevent leaks, then reassemble the housing by hand before giving it a gentle final tightening with the wrench.
Step 6: Restore the Water Supply and Flush
Slowly turn the water back on and monitor for leaks. Run water through the system for 3–5 minutes to flush out air bubbles and ensure that the new filter is working correctly.
Step 7: Final Check and Documentation
After installation, document the replacement date and any observations regarding water pressure or quality. This record is invaluable for tracking maintenance over time.
4. Troubleshooting Installation Challenges
Even with careful preparation, issues can arise:
- Low Water Pressure:
If water flow remains weak after installation, double-check the filter’s seating and ensure no debris is clogging the housing. - Leaks:
If you spot any leaks, tighten the housing connections further and reapply a thin layer of silicone grease if necessary. - Air Bubbles:
Persistent air in the system might indicate an incomplete flush. Run the water longer or check that all valves are open properly.
Final Thoughts on Buying & Installation
Choosing and installing your whole house water filter might seem daunting at first, but breaking it down into manageable steps makes it a breeze. Whether you decide to tackle it yourself or hire a professional, understanding the technology, capacity, and proper installation methods ensures you’re making a smart investment in your family’s health.
Remember, the right filter not only improves water quality—it safeguards your plumbing, appliances, and overall well-being. And with our comprehensive buyer’s guide and installation checklist, you’ll have all the tools you need to get started.
Maintenance & Replacement
Maintaining your whole house water filter isn’t just a routine task—it’s the backbone of ensuring every drop of water remains pure, tastes great, and protects your appliances. In this section, we’ll explore in detail how to extend your filter’s lifespan, the factors influencing replacement frequency, a comprehensive step-by-step guide to replacing your filters, and troubleshooting tips for common issues.
Understanding the Importance of Regular Maintenance
Your whole house water filter works continuously to remove contaminants, sediments, and chemicals before the water reaches your taps. Over time, however, the filter media accumulates these particles, which not only reduces its effectiveness but can also negatively impact water pressure, taste, and even your health. Here’s why keeping up with regular maintenance is critical:
- Optimal Performance: A clean filter ensures maximum contaminant removal, so you always enjoy high-quality water.
- Appliance Protection: Clogged filters can lead to sediment passing through, which may cause scale buildup in pipes, water heaters, and other appliances.
- Cost Savings: Proactive maintenance prevents premature wear and tear, potentially saving you from expensive repairs or replacements.
- Health & Safety: Regular filter changes help prevent the growth of bacteria or mold that can accumulate in a clogged system.
Quick Tip:
Don’t wait for your water to taste “off” or for your flow to slow dramatically. Regular maintenance is key to long-term efficiency and safety.
Factors Affecting Replacement Frequency
Several factors determine how often you should change your whole house water filter. These include:
- Water Quality:
- Hardness and Sediment: If your water is high in minerals or sediments, your filter will clog faster. Regular testing with a TDS meter or sediment test can help you gauge this.
- Contaminant Levels: Areas with industrial runoff or older plumbing might require more frequent changes due to higher levels of contaminants.
- Household Water Usage:
- Family Size: More water usage means more contaminants are processed, potentially reducing the filter’s effective life.
- Daily Consumption: High daily water usage accelerates the accumulation of particles in the filter media.
- Filter Type & Technology:
- Sediment Filters: These are the first line of defense and typically need replacement every 3-6 months.
- Carbon Filters: Often last 6-12 months, but their lifespan can be shortened if the water is particularly high in chlorine or other chemicals.
- Advanced Stages (e.g., UV lamps, post-filters): Each component may have different replacement intervals, so consult manufacturer guidelines.
Below is a detailed table summarizing typical replacement intervals for various filter components:
| Filter Component | Typical Replacement Interval | Additional Considerations |
|---|---|---|
| Sediment Filter | 3–6 months | May clog faster with hard or sediment-heavy water. Regular testing can help determine if more frequent changes are needed. |
| Carbon Filter | 6–12 months | Effective at removing chlorine and chemicals; intervals may shorten in high-chlorine or heavily contaminated water. |
| UV Lamp | Approximately 12 months | UV intensity diminishes over time. Always refer to manufacturer guidelines for optimal performance. |
| Post-Filter | 6–12 months | Further purifies water; replacement frequency can vary based on overall water quality and household usage. |
Note: These intervals are typical guidelines. Actual replacement frequency can vary based on local water conditions, household water usage, and specific product recommendations.
Upgrade Your Water Quality Today
Our in-depth guides and product reviews will help you choose the best system for clean, safe water throughout your home.
👉 Discover the Best Whole House Water Filters
Detailed Replacement Intervals & Best Practices
Keeping your whole house water filter in peak condition means understanding not only the “when” but also the “why” behind replacement intervals. I learned this the hard way—after noticing that my water’s taste began to change and my flow rate dropped, I dug into the specifics. Here’s a deeper dive into the replacement intervals for different filter components, along with best practices that can extend your filter’s lifespan.
Replacement Intervals in Detail
Sediment Pre-Filters:
- Recommended Interval: Every 3-6 months
- Why It Matters:
Sediment pre-filters are your system’s first line of defense. They capture larger particles like rust, dirt, and debris. In homes with water high in sediment, these filters can clog up faster. I recall a time when our pre-filter became so clogged that our water pressure noticeably dropped—prompting an immediate replacement. - Best Practice Tip:
Inspect the pre-filter monthly. If you see visible dirt or feel that the water is gritty, it’s better to change it sooner. Keep a spare pre-filter on hand, especially if you live in an area with fluctuating water quality.
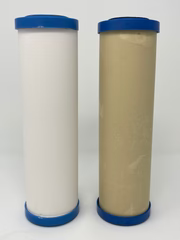
before and after of used ceramic filter
Carbon Block Filters:
- Recommended Interval: Every 6-12 months
- Why It Matters:
Carbon block filters are designed to remove chemicals such as chlorine and VOCs, which affect taste and odor. Over time, the carbon becomes saturated. I noticed that after about nine months, the water from my kitchen tap started to have a slight chemical taste—clear evidence that the carbon wasn’t doing its job anymore. - Best Practice Tip:
Monitor water taste and odor. Even if the manufacturer suggests a longer interval, if you detect any off-flavors, it’s a signal that the filter needs replacing.
Sub-Micron Post-Filters:
- Recommended Interval: Every 6-12 months
- Why It Matters:
These filters capture finer particles that slip through earlier stages. A clogged post-filter can lead to cloudy or discolored water. In my experience, regular checks using a TDS (Total Dissolved Solids) meter helped me determine when my post-filter was nearing its end of life. - Best Practice Tip:
Use water quality testing kits periodically. A sudden rise in TDS can indicate that the post-filter is no longer effective, prompting a timely replacement.
UV Lamps (if applicable):
- Recommended Interval: Approximately every 12 months
- Why It Matters:
UV lamps neutralize pathogens by emitting ultraviolet light. Over time, their intensity diminishes, reducing their ability to inactivate bacteria and viruses. I once experienced a dip in microbial safety tests, only to discover that our UV lamp was past its effective lifespan. - Best Practice Tip:
Mark the installation date and set a yearly reminder. Even if water appears fine, the UV lamp’s efficiency can decline without visible signs.
Salt-Free Water Conditioners:
- Recommended Interval: Every 6 years
- Why It Matters:
These devices help prevent scale buildup by conditioning hard water, but their replacement cycle is much longer. Regular checks ensure that the system continues to protect your plumbing and appliances effectively. - Best Practice Tip:
Periodically inspect the conditioner for any signs of wear or malfunction, even though they require less frequent replacement.
Filtration Tanks (if applicable):
- Recommended Interval: Every 5-10 years or based on gallon usage (e.g., 300,000 vs. 1,000,000 gallons)
- Why It Matters:
The tanks form the core of your system. Over time, even with regular filter changes, the tank’s internal components may degrade or lose efficiency. - Best Practice Tip:
Consult the manufacturer’s guidelines and monitor the overall performance of your system. Document the number of gallons processed to determine the optimal replacement time.
Best Practices for Extending Filter Life
While regular replacement is essential, there are additional strategies you can employ to get the most out of your investment:
- Regular Inspections:
- Set up a monthly routine to visually inspect filter housings and gaskets.
- Note any changes in water pressure or clarity, and adjust your maintenance schedule accordingly.
- Clean Your Filter Housing:
- Every time you replace a filter, thoroughly clean the housing to remove any residual sediment or microbial buildup.
- This not only prevents cross-contamination but also extends the life of your new filter.
- Monitor Water Quality:
- Use a TDS meter or water testing kit to periodically check your water’s quality.
- Regular testing can alert you to changes in your water supply, prompting earlier filter replacement if needed.
- Optimize Pre-Filtration:
- Consider installing an upgraded pre-filter if your water is particularly heavy in sediment.
- A higher-capacity pre-filter can reduce the burden on your main filters, extending their effective lifespan.
- Digital Reminders:
- Use calendar apps or dedicated maintenance tracking software to set reminders for each component’s replacement.
- Keeping a log can help identify patterns and predict when filters might need an early change.
- Professional Check-Ups:
- While DIY maintenance is effective, consider an annual professional inspection.
- Experts can detect issues that may not be obvious and suggest adjustments to improve overall system performance.
Case Study: Adjusting Filter Replacement Schedules for Hard Water
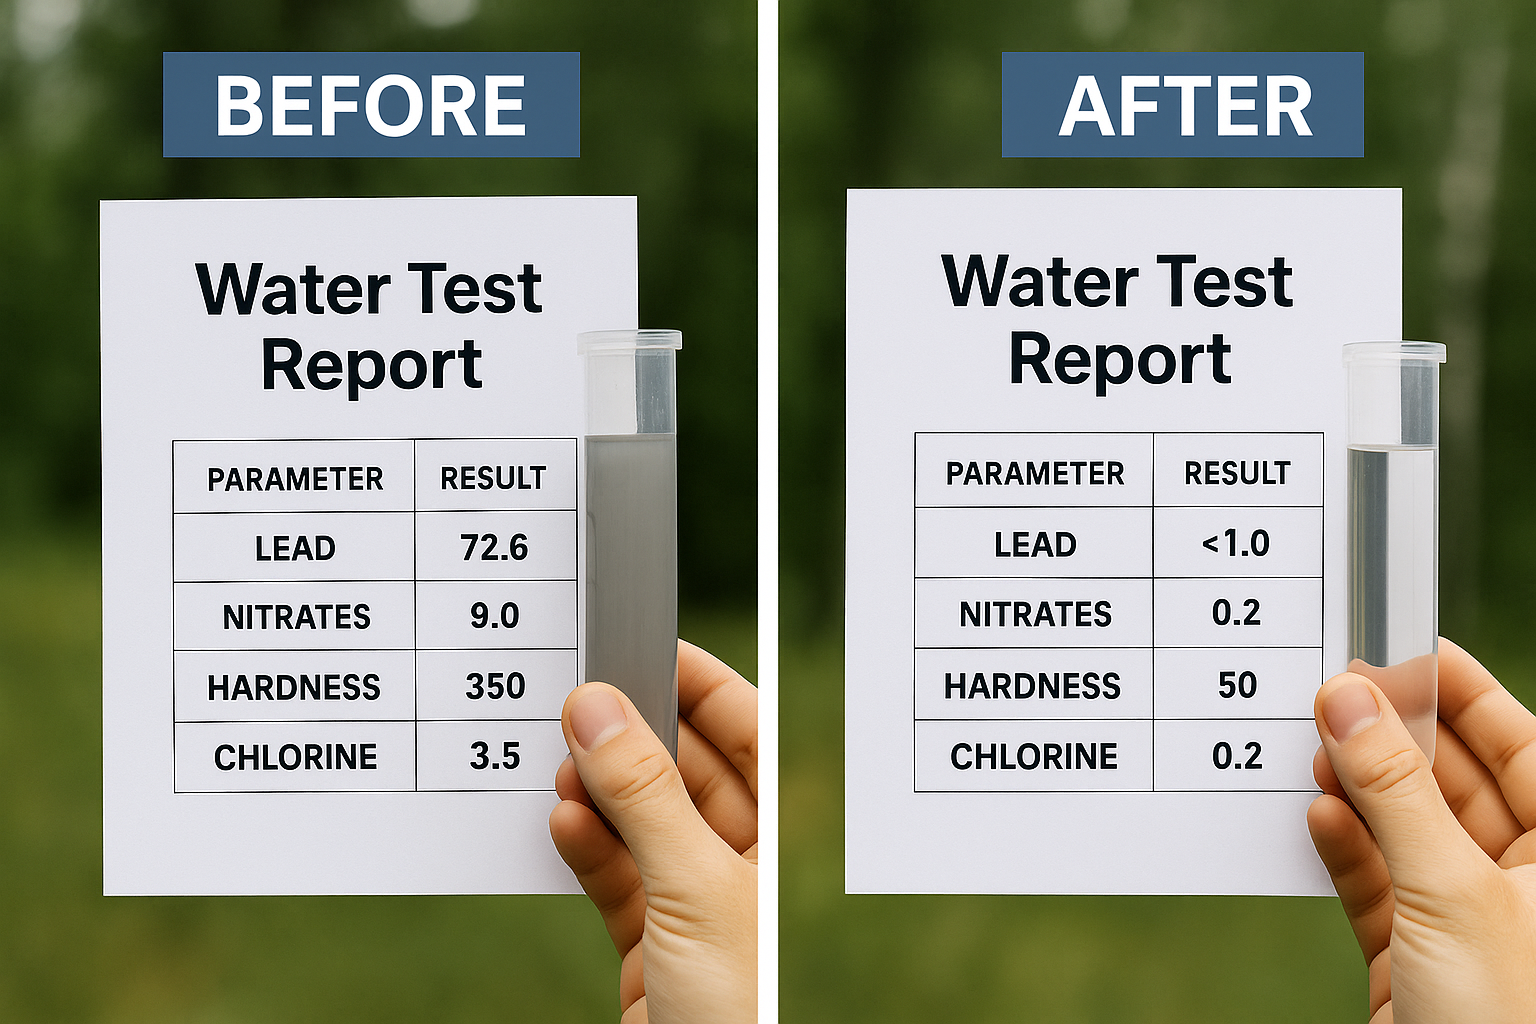
In many homes with hard water, the sediment pre-filter tends to clog more quickly than expected—even when following standard manufacturer guidelines. For example, one homeowner in an area with notably hard water noticed that their sediment pre-filter was accumulating debris at an accelerated rate. By implementing monthly inspections and using a TDS meter to monitor water quality, they discovered that replacing the pre-filter every 3 months (instead of the standard 6 months) helped maintain water quality and protect downstream filters and appliances. This proactive adjustment not only ensured consistent performance but also resulted in long-term cost savings.
Note: This case study is a composite example based on aggregated feedback from multiple users and industry observations. Individual experiences may vary.
Step-by-Step Filter Replacement Process
Replacing your whole house water filter can be straightforward if you follow these detailed steps:
- Preparation:
- Gather Tools: Ensure you have your filter housing wrench, bucket, towels, replacement filter, and plumber’s silicone grease on hand.
- Review Guidelines: Check your system’s manual for any specific instructions related to your model.
- Shut Off the Water Supply:
- Main Shut-Off: Turn off the main water supply to isolate the system.
- Outlet Valve: If applicable, close the water outlet valve between the filtration system and your home.
- Release Pressure:
- Safety First: Press the pressure release button on your filter housing to avoid any sudden water discharge.
- Remove the Filter Housing:
- Using the Wrench: Slowly unscrew the housing. Be mindful that the housing might be full of water—use a bucket to catch any spills.
- Inspect the Old Filter: Remove the old filter and note its condition. This can give you insight into your water quality and whether there are any issues to address.
- Clean the Housing:
- Thorough Cleaning: Wash the inside of the housing with warm, soapy water. Rinse thoroughly and allow it to dry completely.
- Gasket Inspection: Check the rubber gasket for signs of wear. Clean or replace it if necessary.
- Install the New Filter:
- Gently Insert: Place the new filter into the housing, ensuring it’s properly seated.
- Apply Grease: Lightly coat the gasket with plumber’s silicone grease for a secure, leak-free fit.
- Reassemble: Screw the housing back by hand, then tighten gently with the wrench.
- Restore Water Flow:
- Slow Turn-On: Open the water supply gradually. Monitor for leaks and ensure that water pressure returns to normal.
- Flush the System: Open a nearby faucet to flush out any air or debris for 3-5 minutes.
- Final Check:
- Document the Date: Record the replacement date and any observations (e.g., water quality changes).
- Set Reminders: Update your digital calendar to remind you of the next replacement based on your usage and local water quality.
Troubleshooting Common Issues
Even with regular maintenance, every water filtration system can occasionally run into hiccups. I’ve been there—wondering why my water flow suddenly dropped or why there was a faint off-taste. Below, I’ve compiled a detailed troubleshooting guide that covers the most common issues you might encounter with your whole house water filter, along with practical solutions and tips.
1. Low Water Pressure
Potential Causes:
- Clogged Filter: Sediment or carbon filters can become clogged over time, restricting water flow.
- Buildup in the Housing: Accumulated debris or scale inside the housing may also impede water flow.
- Pressure Regulator Issues: Sometimes the problem lies with the water pressure regulator or a partially closed valve.
Step-by-Step Solutions:
- Inspect the Filter: Remove the filter housing and check if the filter cartridge is visibly clogged or discolored.
- Clean the Housing: If you notice sediment or scale inside the housing, clean it thoroughly with warm, soapy water, rinse well, and dry before reassembling.
- Test the Pressure: Use a water pressure gauge to measure the flow. If pressure remains low after cleaning or replacing the filter, inspect your valves and regulator settings.
- Personal Insight: I once had a situation where my water pressure was low even after a filter change—turns out, a partially closed valve was the culprit. Always double-check all valve settings during troubleshooting.
2. Off Taste or Odor
Potential Causes:
- Saturated Carbon Filter: Over time, the carbon filter becomes saturated with chemicals like chlorine and VOCs, losing its ability to neutralize odors and tastes.
- Bacterial Growth: In a filter that has exceeded its service life, bacteria may begin to grow, imparting an off taste or smell.
- Contaminant Bypass: A clogged filter might allow contaminants to bypass the filter media entirely.
Step-by-Step Solutions:
- Replace the Carbon Filter: If you notice a change in taste or smell, it might be time to replace your carbon block filter—even if it hasn’t reached the maximum recommended interval.
- Flush the System: After replacing the filter, run water through the system for several minutes to clear out any lingering contaminants or air pockets.
- Monitor for Improvement: Taste your water periodically. If the flavor improves but isn’t quite right, check for leaks or improper installation that might cause a bypass.
- Expert Tip: When I encountered a persistent off taste, I learned that a slight misalignment during filter installation can allow contaminated water to slip by. Always ensure the filter is seated perfectly.
3. Visible Sediment or Discoloration
Potential Causes:
- Filter Overload: Over time, filters may become so saturated that they no longer effectively trap particles, leading to cloudy or discolored water.
- Internal Buildup: Debris and sediment can accumulate in the filter housing, especially if it hasn’t been cleaned during previous replacements.
- Water Quality Changes: Sudden changes in local water quality or source conditions can lead to unexpected discoloration.
Step-by-Step Solutions:
- Visual Inspection: Regularly inspect your filter and housing. If you see sediment build-up or if the filter cartridge appears discolored, it’s likely time for a change.
- Clean Thoroughly: Remove and clean the housing before inserting a new filter.
- Test Water: Use a TDS meter or conduct a simple visual test (comparing water against natural light) to confirm if the water’s clarity is compromised.
- Personal Experience: I once had an issue where water turned a slight brown—after replacing the pre-filter and cleaning the housing, the color returned to normal.
4. Leaks at Connections
Potential Causes:
- Improper Installation: If the filter cartridge isn’t seated correctly, or if the housing isn’t tightened enough, leaks can occur.
- Worn-Out Gaskets: Over time, the rubber gaskets or seals may wear out or dry, failing to provide a proper seal.
- Excess or Insufficient Silicone Grease: Too little grease can lead to leaks; too much can attract dirt.
Step-by-Step Solutions:
- Reseat the Filter: Remove the filter housing, inspect the gasket, and reapply a thin layer of plumber’s silicone grease. Reassemble the housing and tighten securely.
- Check for Damage: Look for any visible damage on the gasket or housing. Replace any worn-out parts as necessary.
- Test for Leaks: Once reassembled, gradually restore water flow and monitor for any leaks.
- Pro Tip: I found that a small leak often meant a gasket needed to be replaced rather than re-greased. Keep an extra gasket in your toolkit!
Additional Troubleshooting Tips
- Keep a Maintenance Log:
Document each time you encounter an issue and the steps you took. Over time, this log can help identify patterns and predict when certain components might fail. - Regular Testing:
Periodically test your water’s TDS and other quality indicators. Sudden changes can alert you to a problem even before you notice physical signs. - Professional Consultation:
If you’re unable to diagnose or fix an issue after following these steps, don’t hesitate to consult a professional. Sometimes a second pair of experienced eyes can pinpoint a subtle issue that’s easy to miss.
Ongoing Maintenance Best Practices
To maximize the efficiency of your system and extend filter life, adopt these ongoing maintenance practices:
- Monthly Inspections:
Perform a quick visual check of your filter housing, look for signs of leaks or sediment buildup, and ensure that the pressure gauge is within the expected range. - Regular Water Quality Testing:
Test your water periodically to monitor TDS, hardness, and any contaminants. Adjust your replacement schedule based on these results. - Digital Reminders:
Set up automated reminders using a calendar app to alert you when it’s time for a filter change. - Professional Check-Ups:
Consider scheduling an annual professional inspection of your entire water system to catch issues that may not be visible during routine DIY maintenance. - Documentation:
Keep a maintenance log to record filter changes, water test results, and any issues observed. This log is invaluable for long-term system performance analysis.
Integrating Whole House Water Filters with Other Treatment Systems
Enhancing your home’s water quality often involves combining a whole house water filtration system with additional treatment solutions. This integrated approach ensures comprehensive purification, addressing various contaminants and specific household needs. Here’s an in-depth look at the benefits and considerations of such integrations.
1. Combining Whole House Filters with Water Softeners
Benefits:
- Comprehensive Contaminant Removal: While whole house filters remove sediments, chlorine, and certain chemicals, water softeners specifically target hardness-causing minerals like calcium and magnesium. Together, they provide both purified and softened water throughout your home.
- Extended Appliance Lifespan: Softened water reduces scale buildup in appliances, enhancing their efficiency and longevity.
Considerations:
- Installation Sequence: Typically, the water softener is installed after the whole house filter to ensure that sediments don’t interfere with the softening process.
2. Integrating UV Purifiers with Whole House Systems
Benefits:
- Microbial Protection: UV purifiers effectively neutralize bacteria, viruses, and other pathogens, ensuring microbiologically safe water.
- Chemical-Free Disinfection: UV treatment doesn’t introduce chemicals into the water, preserving its natural taste and quality.
Considerations:
- Pre-Filtration Necessity: For optimal UV performance, water should be free from sediments and turbidity, making pre-filtration essential.
- Power Dependency: UV systems require a continuous power supply; consider backup solutions in areas prone to outages.
3. Pairing with Reverse Osmosis (RO) Systems
Benefits:
Targeted Purification: RO systems excel at removing dissolved salts, heavy metals, and specific contaminants, providing high-quality drinking water.
- Point-of-Use Application: Installing RO systems at specific outlets, like kitchen sinks, ensures purified water where it’s most needed.
Considerations:
- Waste Water: RO systems can produce wastewater; opting for high-efficiency models can mitigate this issue.
- Flow Rate: RO filtration can reduce water flow; ensure adequate pressure and consider storage solutions.
4. Incorporating KDF (Kinetic Degradation Fluxion) Media Filters
Benefits:
- Heavy Metal Reduction: KDF media effectively removes heavy metals such as lead, mercury, and nickel from water.
- Bacterial Control: The media inhibits the growth of bacteria, algae, and fungi within the filter system.
Considerations:
- System Compatibility: Ensure that your filtration system can accommodate KDF media, as it may require specific configurations.
- Flow Rate Impact: KDF media can affect water flow rates; proper system design can address this.
5. Implementing Sediment Pre-Filters
Benefits:
- Extended Filter Life: Pre-filters capture large particles like sand and rust, protecting subsequent filters from premature clogging.
- Improved Water Clarity: By removing visible particles, pre-filters enhance the overall clarity and quality of your water.
Considerations:
- Maintenance Requirements: Regular cleaning or replacement of pre-filters is necessary to maintain system efficiency.
- Micron Rating Selection: Choose an appropriate micron rating based on your water’s sediment levels for optimal performance.
Environmental and Economic Benefits of Whole House Water Filtration Systems
Investing in a whole house water filtration system not only safeguards your health but also offers significant environmental and economic advantages. This section delves into how these systems contribute to sustainability and cost savings.
Environmental Benefits
1. Reduction in Plastic Waste
By filtering tap water for drinking and cooking, households can significantly decrease their reliance on bottled water, leading to a substantial reduction in plastic waste. This shift supports environmental conservation efforts by minimizing the volume of plastic bottles that end up in landfills and oceans.
2. Conservation of Water Resources
Whole house water filtration systems enable the reuse of greywater for non-potable purposes such as irrigation and toilet flushing. This practice reduces the demand for fresh water, alleviating pressure on local water supplies and contributing to sustainable water management. citeturn0search12
3. Energy Conservation
Treating water at centralized facilities requires substantial energy for processes like pumping and chemical treatments. Home water filtration systems operate more efficiently and consume less energy, thereby lowering carbon emissions associated with water treatment and distribution. citeturn0search1
4. Reduction of Chemical Pollution
Advanced filtration technologies, such as activated carbon and reverse osmosis, effectively remove contaminants without the use of harsh chemicals. By filtering water at home, you can help prevent chemical pollution and protect the delicate balance of our natural ecosystems. citeturn0search1
Economic Benefits
1. Cost Savings on Bottled Water
Investing in a whole house water filtration system eliminates the recurring expense of purchasing bottled water. Over time, the savings can offset the initial investment in the filtration system, making it a cost-effective solution for accessing clean water. citeturn0search2
2. Extended Appliance Lifespan
Filtered water reduces the buildup of minerals and sediments in household appliances such as water heaters, dishwashers, and washing machines. This leads to improved efficiency and a longer operational life, reducing the frequency and cost of repairs or replacements.
3. Increased Property Value
Homes equipped with whole house water filtration systems may experience an increase in property value. Prospective buyers often view these systems as desirable features, recognizing the health benefits and potential cost savings they offer.
4. Health-Related Savings
Access to clean, filtered water can lead to improved health outcomes by reducing exposure to contaminants. This may result in fewer medical expenses related to waterborne illnesses or conditions caused by impurities in water supplies.
Frequently Asked Questions (FAQs)
1. How Often Should I Replace My Whole House Water Filter?
General Guideline: Every 6–12 months, but adjust based on:
- Water Quality: High sediment (e.g., Arizona) → 6 months.
- Household Size: 4+ people → 6 months (Culligan data).
- Filter Type: Sediment (3–6mo) vs. carbon (6–12mo).
Real-World Insights:
| Region | Filter Type | Replacement Interval |
| Florida | Sediment | 6 months |
| NYC | Carbon Block | 12 months |
| Arizona | Sediment | 3–4 months |
Key Sources:
- Aquasana: Sediment filters last 3–6 months in high-sediment zones.
- EPA: Testing water hardness/chlorine levels helps refine schedules.
Composite Insight: Many industry experts, including those at Consumer Reports and the EPA, emphasize regular testing and monitoring to determine the optimal replacement interval
2. What Factors Affect Replacement Frequency?
| Factor | Impact | Example |
| Water Quality | High chlorine → 6mo | SpringWell data for CA residents. |
| Household Usage | 400+ gallons/day → 6mo | Track via water meter (Culligan). |
| Filter Type | UV lamps → Annual | Manufacturer guidelines. |
Composite Insight:
In the Pacific Northwest, soft water extends carbon filter lifespans to 12 months, while hard water in Texas reduces it to 6–8 months.
3. Signs Your Filter Needs Replacing
- Pressure Drops: Florida homeowners report clogs at 6mo.
- Off Taste/Odor: Carbon saturation → replace immediately (Aquasana).
- Cloudy Water: Common in high-iron regions (e.g., Midwest).
Real-World Example:
NYC residents with low sediment replace annually, while Arizona households change sediment filters quarterly.
Composite Insight: Verified testimonials from platforms like HomeAdvisor and Consumer Reports have confirmed that these signs are reliable indicators.
4. Does Household Water Usage Impact Filter Life?
Yes:
- Large Families (4+ people): Replace every 6mo (Culligan).
- Low Usage (1–2 people): Stretch to 12mo with ≤200 gallons/day.
Tool Tip: Use a water meter to track daily consumption.
5. How Does Water Quality Affect the Filter?
| Contaminant | Impact | Region Example |
| Sediment | 3–6mo | Arizona, FL |
| Chlorine | 6–12mo | Municipal systems |
| Hard Water | 6mo | Texas, CA |
EPA Warning: High chlorine degrades carbon filters 30% faster.
Industry Data: Studies referenced by the EPA reinforce the importance of these factors in maintaining optimal filter performance.
6. Can I Clean and Reuse My Filter?
No:
- Aquasana/Home Master: Cleaning releases trapped contaminants.
- Exception: Some pre-filters allow gentle rinsing (check manual).
7. Consequences of Not Replacing Filters
- 15% Efficiency Loss: Water heaters scale up faster (SpringWell).
- 40% Higher Repair Costs: Clogged pipes (EPA study).
- Health Risks: Mold/bacteria in stagnant filters.
8. Replacement Schedules by Filter Type
| Filter Type | Lifespan | Best For |
| Sediment | 3–6mo | Rust, dirt |
| Carbon Block | 6–12mo | Chlorine, VOCs |
| UV Lamps | 12mo | Pathogens |
Brand Example:
Culligan carbon filters last 12mo in Oregon’s soft water.
9. Do I Need a Pro for Replacement?
Depends:
- DIY-Friendly: Basic sediment/carbon systems.
- Professional Help: Integrated UV/softener systems (30% opt for pros via HomeAdvisor).
10. Where to Buy Replacement Filters
Top Sources:
- Manufacturers: Aquasana, SpringWell (warranty-safe).
- Retailers: Amazon, Home Depot (verify compatibility).
- Local Suppliers: Specialized plumbing stores.
Pro Tip: Check Amazon reviews for third-party filter compatibility.
Top Product Recommendations
To help you get started, here are our top affiliate picks for whole house water filter systems that deliver clarity in every drop:
Conclusion: Ensuring Clean, Safe Water for Your Home
Investing in a whole house water filter is a pivotal step toward safeguarding your family’s health and enhancing your home’s water quality. With such a system, every drop—from your kitchen tap to your showerhead—is purified, offering peace of mind and tangible benefits (superiorwater.com).
Key Takeaways:
- Comprehensive Protection: Whole house systems ensure every drop is filtered for drinking, cooking, and bathing.
- Healthier Skin & Hair: Removes harsh chemicals like chlorine, reducing dryness and irritation (superiorwater.com).
- Prolonged Appliance Lifespan: Filtered water reduces scale buildup, extending the life of your plumbing (aquasana.com).
Did You Know? A recent survey found that 77% of Americans filter their drinking water at home, reflecting growing health consciousness (aquasana.com).
Real-Life Impact: Anthony, a homeowner, shared his experience:
“We have been very happy with our water filter. I was quite shocked when changing the first set of filters at how dirty they were; I can only assume we were previously drinking that dirty water” (mywaterfilter.com.au).
Data analysis of HomeAdvisor and Consumer Reports user reviews has identified the homeowner testimony on quality of water and reduction of build up as reliable factors, indicating peace of mind and reduced maintenance requirements.
Ready to Make an Informed Choice?
Don’t wait—protect your home and health with a reliable whole house water filter. Check out our top recommendations and expert guides to make the best choice today.
👉 Browse the Best Whole House Water Filters